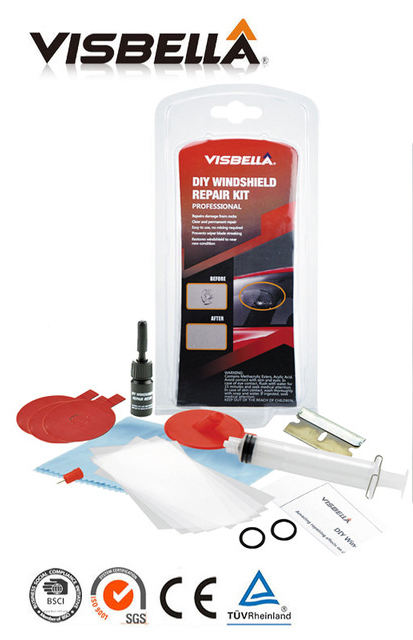
Visbella DIY Windshield Repair Kit is a handy tool to help you repair your car’s broken windshield in just 30-50 minutes. This kit will minimize the appearance of chips and cracks in your windshield and help to prevent them from spreading further. It works by removing air from the break and then fills it with durable resin, making the area even stronger than before. You can achieve easy and quick, professional quality repairs at a fraction of the cost.
Instructions
Clean damaged area. Clean out any loose glass particles from PIT of the break using pin from injector. Replace pin after use. Clean area surrounding break using dry cloth or paper towel.
Step 2
Mount seal to windshield. Peel backing off one side of adhesive seal. Line up hole in with pit, press seal to glass. Run finger seal to insure a good bond.
Step 3
Remove backing from seal Peel backing from top side of adhesive seal. Place resin into pedestal. Cut tip off resin container to open stem. Place stem ¼ inch to pedestal opening. Slowly squeeze 5 to 6 drops into pedestal. Wipe any excess resin from tip with cloth and save the empty container for next step.
step 4
Connect injector to pedestal. Insure plunger tip positioned in injector barrel just above the pin alve. Press fit injector into pedestal with the pin valve lined up with the tab. Insure connection is tight.
Step 5
Lock plunger in vacuum position. Hold injector with one hand, pull plunger upward with the other hand. Lock plunger by engaging lower notch in plunger with spring clip. Release hands and allow device remain in locked position. Let sit for 10 minutes.
Step 6
Fill injector with air. Take injector out from the pedestal, make the plunger to its maxi position, put the injector back to the pedestal.
Step 7
Move plunger to pressure. Hold injector with one hand and rotate plunger releasing spring clip from lower notch, depress plunger downward engage upper notch with spring clip.
Step 8
Remove pedestal from glass loosen outer edges of pedestal with safety razor once top part of pedestal and seal is bent away from glass surface, grip pedestal tab as shown. Slowly pull up until removes. Wipe and remove excess resin.
Step 9
Pit filling procedure. Hols resin container in one hand and make ready the clear curing film in the other hand. Slowly squeeze container applying a drop of resin in pit. Place clear curring film over pit holding resin in the pit.
Step 10
Curing and finishing. Run safety razor over clear film to vent out any air bubbles. Note ultra violet sun rays cure the resin. Park vehicle to direct sunlight for 15 min. to finish, scrap off cured resin and clear film flush with the glass surface using safety razor.